Google Analytics is a suite of website traffic tools that helps you monitor your website traffic as well as where your traffic is coming from and lots more.
Thankfully, it’s super easy to add Google Analytics to Blogger. Since Blogger.com is a Google company, they’ve made the process beyond simple.
1. Sign Up for Google Analytics
1. Go to the Google Analytics web page.
2. Sign in using your Google account email. For Blogger.com, you can use the same email you used for your blog.
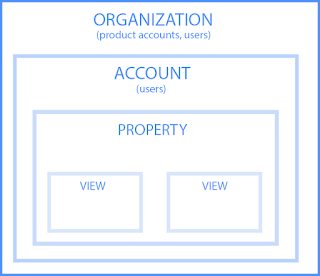
Before proceeding, you may want to know the basic structure of Google Analytics. The following figures show the hierarchy of organizations, accounts, users, properties, and views, and two structures of two Analytics accounts and in Google Analytics.
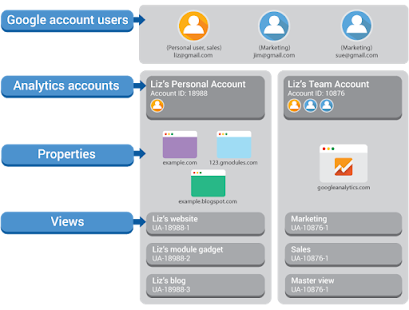
So, you can have multiple Analytics accounts and at least one property is created in Analytics account. Put it simply,
- An organization represents a company, and lets you access your company’s product accounts (e.g., Analytics, Tag Manager, Optimize), and manage product users, permissions, and cross-product integrations. You access your organizations at marketingplatform.google.com/home. Organizations are optional.
- An account is your access point for Analytics. One or more Analytics accounts can belong to an organization.
You need at least one account so you can have access to Analytics, and so you can identify the properties you want to track. How you manage the relationship between accounts and properties is up to you. You can use a one-to-one relationship of one account/one property, or you can use a one-to-many relationship of one account/many properties. You can have multiple Analytics accounts. If you do not have an account, sign up for one at marketingplatform.google.com.
- A property is a website, mobile application, or device (e.g., a kiosk or point-of-sale device.) An account can contain one or more properties.
Within an Analytics account, you add the properties from which you want to collect data. When you add a property to an account, Analytics generates the tracking code that you use to collect data from that property. The tracking code contains a unique ID that identifies the data from that property and makes it easily identifiable in your reports. Analytics also creates one unfiltered view for each property you add.
- A view is your access point for reports; a defined view of data from a property. You give users access to a view so they can see the reports based on that view's data. A property can contain one or more views. For example, within a property you might have:
one view of all the data for www.example.com
one view of only AdWords traffic to www.example.com
one view of only traffic to a subdomain like www.sales.example.com
When you add a property to an account, Analytics creates the first view for that property. That first view has no filters, and so includes all the data for that property. You should leave this original view unfiltered, so that you always have a view in which you can see all the data. You can create additional views and apply filters to them so that they each include the specific subset of data in which you're interested.
Once you create a view, the reports for that view will show data from the creation date of the view forward. For example, if you create a view on June 1, that view will show data from June 1 forward, but will not show any data collected prior to June 1.
For more details, please refer to https://support.google.com/analytics/answer/1009618?hl=en and https://support.google.com/analytics/answer/1102152?hl=en&ref_topic=1102143.
3. Having known Google Analytics’ hierarchy, you will first of all need to (create and) sign up for an Analytics account (if you do not have such an account).
A.
Create or sign in to your Analytics account:
a) Go to google.com/analytics
If you do not have an Analytics account, then click Start for free. Fill in your Account Name----click next----Under What would you like to track? choose Website---- click next----Fill in your Website Name, Website URL, and select an Industry Category and Reporting Time Zone. Accept the service term.
Then, you will be taken directly to your account dashboard, and your Tracking ID and tracking code will be prominently displayed on the page. The ID and tracking code will be needed to add to Blogger. Copy this code and hang onto it for installing Google Analytics on Blogger. However, I will show you another
If you already had an Analytics account, then click Sign in to Analytics. 1. Select your right analytics account and the right property
B. Now, you need to add your own tracking ID (as shown in the above figure to your blogger note the tracking ID in the picture above is mine, not yours.) on your Blogger website so that the property under your analytics account become your website on Google Analytics.
Go to your blogger homepage---Settings---- Basic---- Google Analytics property ID to fill your tracking ID into this and then click Save.
2. Install Google Analytics on Your Website
In addition to adding tracking ID of GA on Blogger website, you also need to deploy Google tags on your website. You have two ways to do this: Global Site Tag or Google Tag Manager. For difference between the two ways, you may refer to https://support.google.com/tagmanager/answer/7582054?hl=en and https://www.obilityb2b.com/blog/how-to-choose-between-google-tag-manager-and-global-site-tag/.
2.1 Global Site Tag Approach
1. Go to your Google Analytics Admin section (left bar) and select Tracking Info > Tracking Code
2. Copy and paste this code as the first item in the <head> part of every page.
2.2 Google Tag Manager Approach
This approach is preferred if you want to apply more complex and customized tracking or you are new to use Optimize. I also recommend you to try this approach.
1. Set up Google Tag Manager
Refer to my another article.
2. Install Google Analytics through Google Tag Manager
A. Create a Universal Analytics Tag
a) Sign in to Google Tag Manager. On the Workspace Overview screen, click New Tag. Or from anywhere in your container, click Tags and then New. A new tag definition screen will appear.
Tag Configuration: Where the data collected by the tag will go.
Triggering: What type of data you want to collect.
b) Click Tag Configuration and choose Google Analytics: Universal Analytics option.
c) Select the desired Track Type. (For example, use Page View on a website to measure which pages your users visit. Use Event if you want to measure a specific interaction, such as a button click on a promotion.). Here I choose page view.
B. Google Analytics settings: Select or Create a Universal Analytics tracking ID variable
- To reuse a Google Analytics Settings Variable that has already been set up:
a) Select the desired variable from the menu. Your Google Analytics ID and all other settings from that variable will be applied to your tag.
- To set up a new Google Analytics Settings Variable:
Now we will store the Google Analytics Tracking ID into a new variable so we don’t have to remember our tracking code every time we need to use it.
i. In the Variable Configuration screen, enter your Google Analytics ID.
ii. Cookie Domain: If you have no other Google Analytics tags deployed on your site via analytics.js or from Tag Manager, you should leave this value set to "auto". If you have other Google Analytics tags set up on your site or in Tag Manager, you should confirm that the Cookie Domain value is consistent.
iii. If you require additional settings such as setting custom fields, custom dimensions, custom metrics, content groups, display advertising features, Enhanced Ecommerce features, or cross domain measurement, click More Settings and configure the relevant fields.
iv. Click Save.
v. You will be prompted to rename the variable if you have not done so already. You may opt to choose to accept the default setting or enter a name of your own. Click Save to complete the tag setup.
C. Add a Page View Trigger
It is time to add a trigger to your tag. Triggering is setting the conditions where your tag will be executed.
Click Triggering to choose a trigger that will make the tag fire. You may select an existing trigger, or click the + icon to define a new one.
a) Create/choose “Page View” Trigger that will fire on “All Pages” , click Save and rename the tag.
If you want to create new trigger, click “+” icon at the top right corner
D. Rename the tag
E. Preview Your Tag
Now it is time to preview if your tag is firing properly.
a) Click preview
b) You should have the mention “Now previewing workspace”.
F. Publish your GTM container
G. For more details about Deploy Google Analytics with Tag Manager, refer to https://support.google.com/tagmanager/answer/6107124#settings_variables.


Comments
Post a Comment